Whether you’re a beginner or an experienced artist, painting a Tiger with watercolor can be a rewarding experience. We’ve created a step-by-step guide that’s designed to be clear, concise, and easy to follow. We’ll provide you with helpful tips and techniques, and guide you through the process of creating a beautiful watercolor painting of an animal.
Our aim is to provide you with a guide that’s both comprehensive and accessible so that you can create a stunning piece of art with confidence. So whether you’re looking to improve your skills or just want to try something new, this guide is the perfect place to start. Let’s dive in and bring your Tiger to life on paper!
Before you start painting, make sure you have all the necessary supplies. You will need:
- Watercolor paper
- Watercolor paints
- Brushes (different sizes)
- Water container
- Pencil
- Eraser
How to Paint a Tiger with Watercolor
Step 1: Create the basic shapes
Sketch your subject lightly in pencil on your watercolor paper. Start with basic shapes (circles, squares, triangles) and try to get the right proportions. Once you have the basic structure in place, add more details and refine the sketch, paying close attention to the areas of the Tiger’s body that you want to emphasize in your painting. Do not worry about getting it perfect, this is just a rough draft. To not have the sketched lines appear in your final artwork, use an eraser to remove or make the sketch less visible.
Step 2: Add light colors
Start with a light wash of color over the entire Tiger, using the wet-on-wet technique. When adding a light wash of color on top of your watercolor sketch, it’s important to keep the overall composition in mind and to use a light touch to avoid overpowering the underlying sketch.
Step 3: Layer the paint
Watercolor painting is all about layering Start with light washes of color and build up to darker shades. Let each layer dry before adding another. This will help prevent the colors from bleeding into each other. To speed up drying you can use a hair blower gently.
Step 4: Add details
Pay close attention to the eyes, using detail brushes to create a lifelike effect.
Add shadows and highlights
To make your painting more realistic, add shadows and highlights. This will help create depth and dimension. Use darker shades to create shadows and lighter shades to create highlights. Try seeing color when there does not seem to be one (never use completely black).
Step 5: Final touches
Once you’re happy with your painting, add any final touches. This could be adding more details or adjusting the colors. Take a step back and look at your painting from a distance to see if there are any areas that need tweaking.
Make sure to sign your newest artwork!
Let your painting dry completely before framing or storing it.
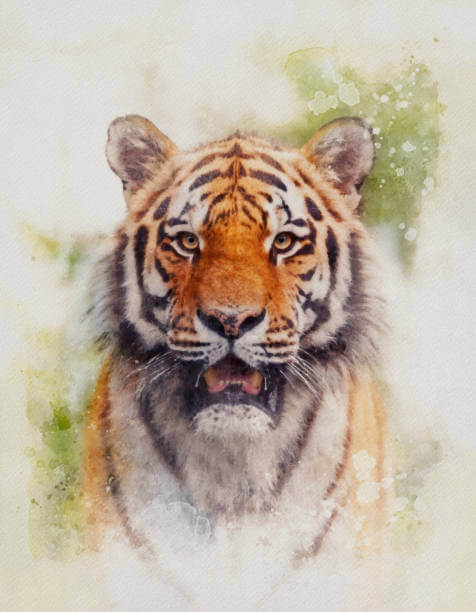
Here is some inspiration for your Tiger painting
Using high-quality inspirational pictures can help you visualize the subject you’re painting and give you a better understanding of its proportions, colors, and details. By capturing the essence of your subject, you can create a more realistic and accurate painting. This, in turn, can push your creativity and allow you to experiment with different styles and techniques while staying true to the natural beauty of the Tiger.
Let us know what you end up with in the comments or through our social media (Pinterest / Instagram / Facebook)
Additional tips on how to Paint a Tiger with Watercolor
Movement
When painting a moving Tiger, it’s important to first observe the way the animal moves in real life. Study the Tiger’s posture, gait, and movements to get a better understanding of its body language. Once you have a sense of the Tiger movement, start with a loose sketch of the basic shapes and lines of the Tiger in motion. Use light and fluid brushstrokes to capture the flow of the animal’s movement. Then, begin to layer in colors and details, paying close attention to the areas of the Tiger’s body that are in motion. Use a variety of brush sizes to create texture and depth. Finally, add shadows and highlights to bring the Tiger to life and make it appear more dynamic. Don’t be afraid to experiment with different colors and techniques to convey the sense of motion in your painting. With practice and observation, you can master the art of painting the motion of a Tiger with watercolor.
Composition
Composition is an important aspect to consider when painting a Tiger. It involves deciding what parts of the Tiger to paint and how to arrange them in the painting. One important factor to consider is the ground floor. Including a ground floor can add context to the painting and help ground the Tiger in its environment. However, not including a ground floor can create a sense of motion and dynamic movement, allowing the Tiger to appear as if it’s in mid-air. Ultimately, the decision to include a ground floor or not depends on the overall composition and the effect you want to achieve.
Another important aspect to consider when it comes to composition is the background. The background can either complement or contrast with the Tiger and can help set the mood of the painting. For example, a bright and colorful background can convey a sense of playfulness, while a dark and moody background can convey a sense of mystery or danger. It’s important to consider the colors and textures of the background in relation to the Tiger and to ensure that it doesn’t overpower the main subject of the painting.
Foreshortening is another technique to consider when composing a painting of a Tiger. It involves exaggerating the proportions of the Tiger to create a sense of depth and perspective. This technique can be challenging to master, but when done correctly, it can add a sense of drama and dynamism to the painting. It’s important to observe the Tiger’s posture and movements in real life to accurately capture the sense of foreshortening. By carefully considering these compositional factors, you can create a painting that is both visually stunning and emotionally impactful.
Common questions
How do I make a Watercolor Tiger more realistic?
To make a watercolor drawing of any animal super realistic, start by studying reference photos or real-life animals to understand the unique characteristics and features of the animal. Use a light pencil to sketch out the basic proportions of the animal, paying close attention to the details of the eyes, nose, and mouth. Then, gradually build up layers of color and value, using a variety of techniques such as glazing, wet-on-wet, and dry brush to create a sense of depth and dimensionality.
Pay close attention to the subtle nuances of color and value in the animal’s fur, feathers, or scales, and use a variety of brushes to create texture and movement. Finally, refine the details and add highlights and shadows to enhance the realism of the animal.
Remember to work slowly and patiently, building up layers gradually to create a sense of depth and richness in the final piece.
You might also want to better understand how your painting supplies affect the final outcome and how it can be improved.
How to make a simple watercolor painting of a Tiger
To simplify a watercolor drawing of any animal, start by breaking down the shapes of the animal into basic geometric forms such as circles, squares, and triangles. Then, use light pencil lines to sketch out the basic proportions of the animal, paying attention to the overall shape and balance. Next, eliminate any unnecessary details and focus on the essential features that define the animal’s form, such as the eyes, nose, and ears. Finally, use a limited color palette and simple washes to create a sense of depth and texture, while keeping the overall design clean and uncluttered.